How to Use
Everything SnagTrax can do, one step at a time.
What do you want to do?
Quick Start
-
Open a song
Tap Open menu on the start screen, then Open File, and pick a song or video from your device.
-
Move around
Drag the record to move through the track, or tap a spot on it to jump there.
-
Mark a moment
Tap MARK to save a bookmark where you are. Tap the bookmark later to jump straight back.
Stuck? Most panels have a ? button that explains each part. The walkthrough of the player can be played again from Features & Account → Interface.
Everything, by feature
The Player
Get something playing, find your way around the record, and change speed and pitch.
The Player
Get something playing, find your way around the record, and change speed and pitch.
The Player at a Glance
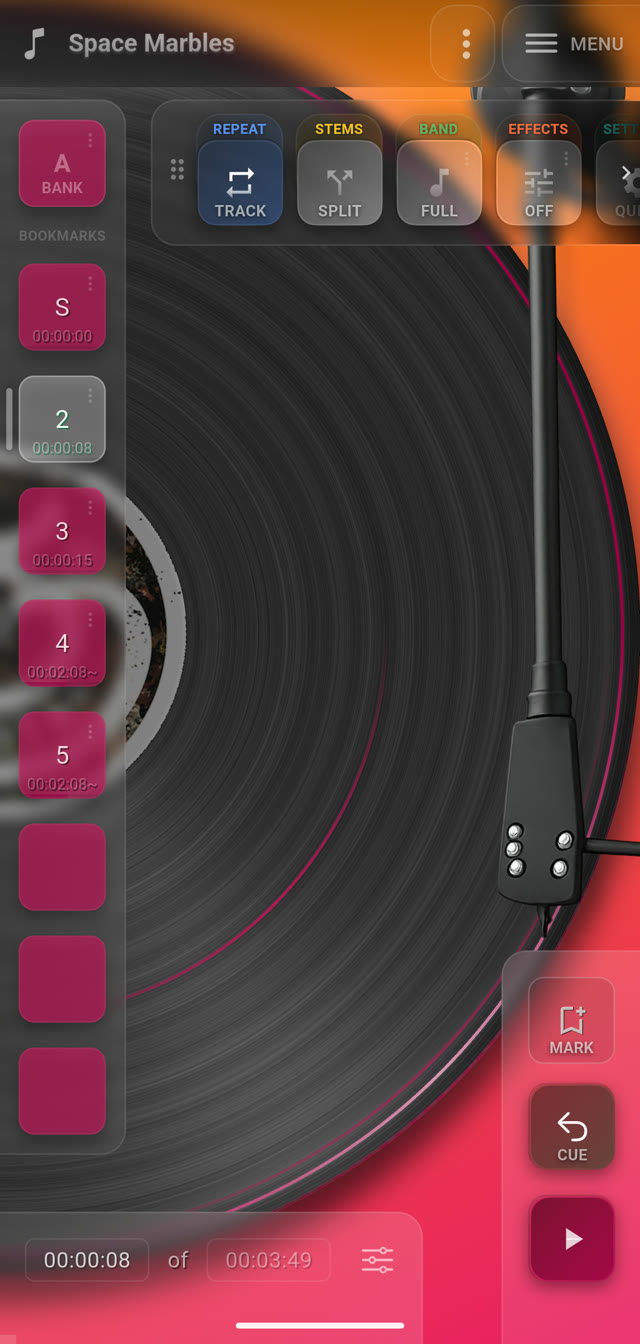 12345678
Everything happens on one screen. The record spins in the middle, and the controls sit around it:
- 1MENUTop right. Opens everything that isn't the player: files, YouTube links, your history, the album crate and Snap-to-Sound.
- 2The recordDrag it to move through the track, or tap a spot to jump there.
- 3The labelThe record's centre, at the left edge. Tap it to hide the controls; hold it for a snapshot or to lock the screen.
- 4MARKSaves where you are as a bookmark. Hold it to set where the bookmark ends.
- 5CUEJumps back to where you last dropped the needle.
- 6BOOKMARKSYour saved moments, in four banks of eight. Tap one to jump to it.
- 7The action rowThe tools above the record — STEMS, BAND, EFFECTS, REPEAT and more. Tap + at its end to choose which ones appear.
- 8The sliders buttonBeside the time. Opens speed, pitch, tempo and the waveform.
Opening Something
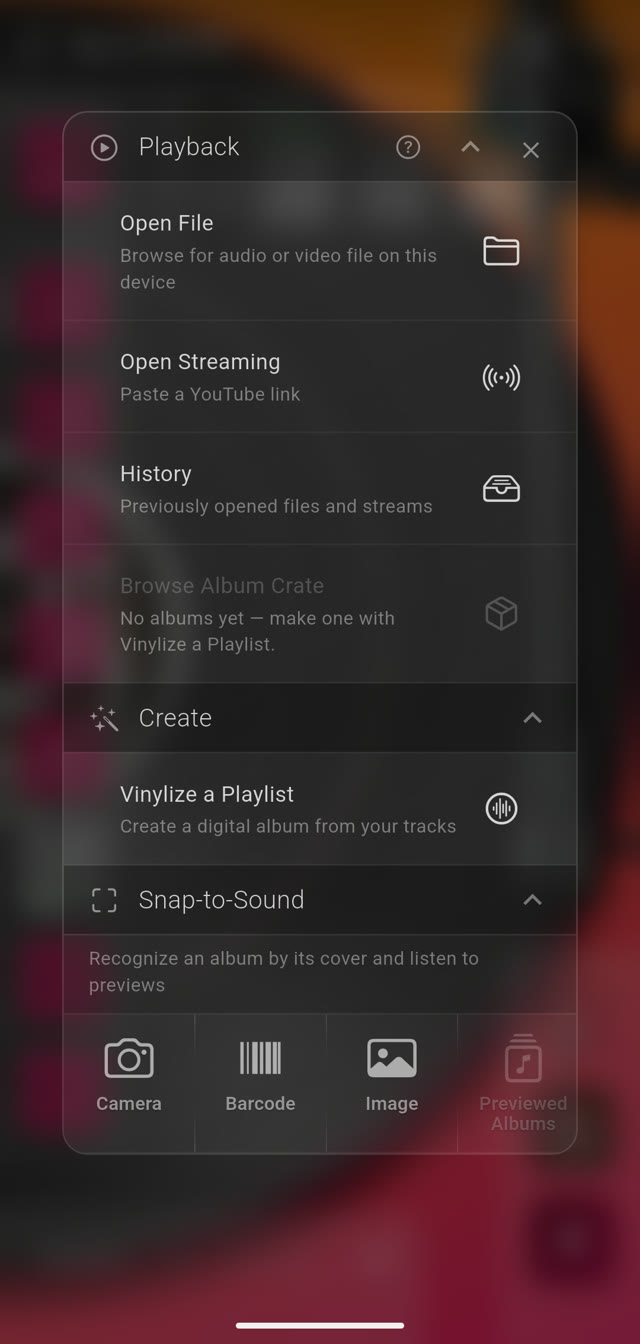
MENU at the top right — or Open menu on the start screen — leads to everything you can play:
- Open File — a song or video from your device.
- Open Streaming — paste a YouTube link.
- History — anything you've opened before.
- Browse Album Crate — the albums you've made.
- Vinylize a Playlist — press a set of your tracks into an album of its own.
- Snap-to-Sound — find an album from its cover or barcode and hear a preview.
You can also share a YouTube video to SnagTrax straight from the YouTube app or your browser.
Moving Around the Record
Drag the record forwards or backwards to move through the track. Tap a point on it to jump there: the outer edge is the start and the label is the end. Pinch to zoom into the grooves for finer control, and pinch out again to come back.
Tap the label to hide the controls, and tap it again to bring them back. Hold the label for two more options:
- Take Vinyl Snapshot — a picture of your record to share.
- Lock Screen — ignores every touch, so the record can be watched or handed round. Hold the label for two seconds to unlock.
Cue
The cue is where the needle last dropped. Tap CUE to jump back to it; while paused on the cue, tap CUE to hear it. Hold CUE to move the cue along the waveform, then hold it again when you're done.
Speed, Pitch & Tempo
Tap the sliders button beside the time to open the playback panel:
- Speed — slow a hard passage down, or speed it up, without changing its key.
- Pitch — move the key up or down in semitones without changing the speed. Not available for videos or YouTube.
- Measure Tempo — tap the pad along with the beat to find the song's BPM.
- Custom Speed — once the tempo is measured, play the song at a target BPM you tap or type.
- The waveform — shows your bookmarks and the cue. Drag it sideways to scrub.
Picking Up Where You Left Off
Reopen something you stopped part-way through and it starts from the top, with a notice offering the place you left it — for example “Left off at 2:04 · Resume”. Tap Resume to carry on, or ignore it. To stop the notice, turn off Resume Notice in Features & Account → Interface.
Track Info
Tap the title at the top of the player to open Now Playing, with the artist, album, artwork and more.
Karaoke & Stems
Split a track into separate parts, mute the vocals for karaoke, or isolate the bass, drums, or a single drum piece.
Karaoke & Stems
Split a track into separate parts, mute the vocals for karaoke, or isolate the bass, drums, or a single drum piece.
Splitting a Song
- Open a song or video from your device. The STEMS button in the action row reads SPLIT until the track has been split.
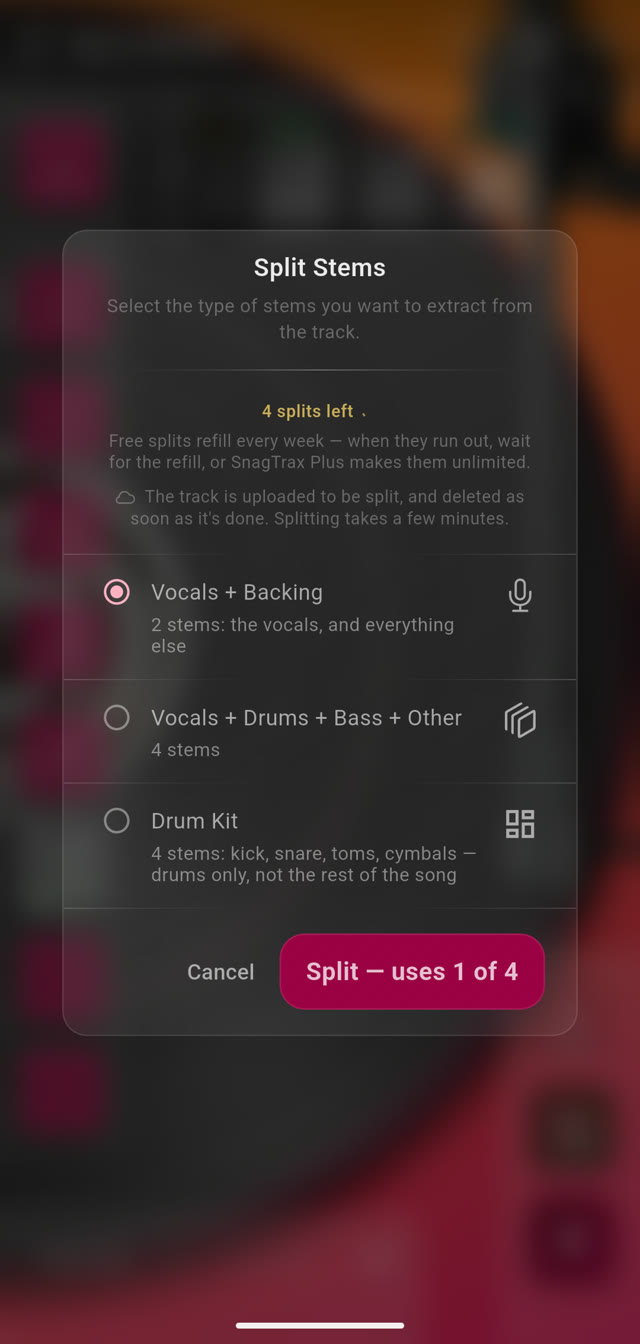
- Tap SPLIT and choose what you want: Vocals + Backing for karaoke, Vocals + Drums + Bass + Other for four parts, or Drum Kit for kick, snare, toms and cymbals.
- For Drum Kit, choose a method: Direct splits straight from the song, while Isolate first lifts the drums out of the mix before splitting them, which is cleaner. Both use one split.
- Tap Split. The button says how many of your splits it uses.
- Wait a few minutes. The track is uploaded, split on our servers and deleted as soon as it's done. The parts are saved on your device, so switching between them is instant.
Splitting works on files from your device, not on YouTube videos.
Mixing the Parts
Once a song is split, tap STEMS to step through the parts — each one alone, your saved mix, then all of them together. Hold STEMS to open the Stems sheet:
- Mix — set the level of each part: take out the vocals, bring up the bass, or play one part on its own. SnagTrax remembers the mix for next time.
- Switch — split the song a different way, or bring back a split you've already made.
- Export — save each part as a file, or all of them at once, with your effects and speed if you like.
Splits & Plans
On the free plan, every device gets a few splits each week, and each split uses one. A split that fails costs nothing. Split Stems shows how many you have left and when they refill.
- Free — a few splits a week, for tracks up to 4 minutes.
- Plus — unlimited splits, tracks up to 10 minutes, and WAV and FLAC stems.
- Pro — everything in Plus, tracks up to 45 minutes, the fastest queue, and hardware kits for MPC and Deluge.
If a Split Comes Back Unusable
Report it within the refund window and you get the split back: tap Report failure on the notice that follows the split, or, with the song open, choose Report the last split as unusable on the Stems sheet's Switch tab. The window is short, so listen to the parts soon after they arrive.
Practice & Learn
Learn a part of a song by bookmarking sections, looping them, and adjusting the speed and key.
Practice & Learn
Learn a part of a song by bookmarking sections, looping them, and adjusting the speed and key.
Bookmarks
- Tap an empty bookmark to choose where the next one goes.
- Play the track and tap MARK at the moment you want. A notice confirms it, with Undo.
- Hold MARK when you reach the end of the passage to set where that bookmark ends.
- Tap a saved bookmark to jump straight back to it.
Bookmarks are saved automatically, for each track. With Tap slicing on in the Bookmarks settings, each MARK moves on to the next bookmark, so repeated taps slice a track into sections. New bookmarks can also snap to the nearest transient.
Editing a Bookmark
Hold a saved bookmark to open it. Tap Label to name it, and use Copy, Paste, Export or Share for its clip.
Tap its waveform to set the start and end exactly: drag to move a point, pinch, or hold and drag, to zoom, and tap to hear it. Undo and Redo are there if you change your mind.
Banks
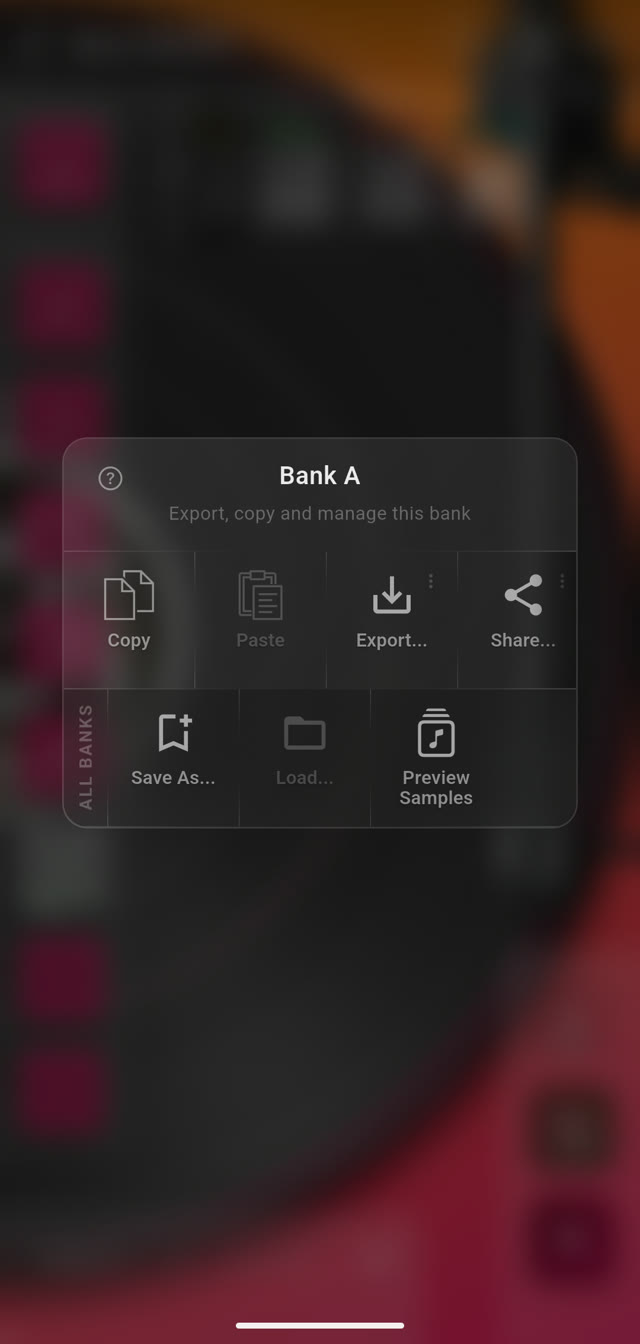
Bookmarks come in four banks, A to D, so you can keep separate sets for the same song. Tap BANK to switch banks. Hold BANK to work with the whole bank:
- Copy and Paste — move a bank's bookmarks into another bank.
- Export and Share — send the whole bank out as clips or hardware kits.
- Save As and Load — keep all your banks under a name, and bring them back later.
- Preview Samples — play every bookmark as a pad.
Looping With Repeat
Tap REPEAT to choose what happens at the end: OFF plays the track once, TRACK loops the whole track, and BOOKMARK loops the bookmark you're in — ideal for drilling a solo or looping a break.
Preview Samples
Hear each bookmark as a pad before you export it. Hold BANK or a bookmark, then tap Preview Samples. Tap a pad to play it, switch banks with A to D along the top, and tap Stop to cut everything.
Frequency Bands
BAND narrows what you see and hear to one slice of the mix: bass, mid, high, or a band you set yourself. Hold BAND to choose the band; after that, a tap turns it on and off. It's handy for picking out a bass line or a hi-hat pattern.
YouTube, Video & Albums
Play YouTube and your own videos, find an album from its cover, and press your tracks into a record.
YouTube, Video & Albums
Play YouTube and your own videos, find an album from its cover, and press your tracks into a record.
YouTube Videos
Share a YouTube video to SnagTrax from the YouTube app or your browser, or paste its link under MENU → Open Streaming. It plays through YouTube's own player, in a frame you can move and resize. Slow it down, loop a section and set bookmarks. Pitch and splitting aren't available for YouTube videos.
Your Own Videos
Open a video with Open File and it plays in a frame over the record, with the same speed, loop and bookmark controls as a song.
- Move and resize — drag the frame to move it, and pinch it to change its size.
- Fullscreen — double-tap the frame. Pinch to zoom in on a detail, tap to pause, and swipe down to leave.
- Mirror — flips the picture, handy when you're copying moves while facing the screen.
Snap-to-Sound
- Open MENU and go to Snap-to-Sound.
- Choose Camera to photograph an album cover, Barcode to scan its barcode, or Image to use a photo you already have.
- SnagTrax identifies the album and plays it as a preview record. If it isn't sure, it offers a few candidates; if it can't find a match, you can edit the search or look on YouTube.
Albums you've previewed are kept in Previewed Albums, next to Snap-to-Sound.
Vinylize a Playlist
- Open MENU, tap Vinylize a Playlist, and pick your tracks — up to 30.
- Swipe through the covers found in your tracks, or add your own image.
- Drag tracks to reorder them, or swipe left to remove one. SnagTrax lays them out on sides by length.
- Tap Press vinyl and name your album.
Your new record is kept in the Album Crate.
The Album Crate
Browse Album Crate, in the menu, holds every album you've made. Open one and it plays as a record, track by track. LISTEN, at the start of the action row, switches between playing the album and editing it as one long track with bookmarks of its own. To rename the album or its tracks, tap the title and choose Edit names. Hold an album in the crate to delete it.
Effects & Export
Add effects to your mix, then export your loops and stems to your device or favorite hardware.
Effects & Export
Add effects to your mix, then export your loops and stems to your device or favorite hardware.
Effects
Hold EFFECTS to open the effects rack, then tap + to add an effect. Effects run in order from top to bottom:
- ⚙ — adjust the effect. Changes are live while the track plays.
- The switch — turn one effect off for a moment.
- The handle — drag to change the order.
- Swipe left — remove the effect.
A tap on EFFECTS turns the whole rack on or off. Each song remembers its own effects. Effects work on audio files, not on videos. On iPhone and iPad, the rack also offers the Audio Unit effects installed on the device.
Export & Share
Any bookmark can go out as an audio clip:
- One bookmark — hold it, then Export or Share.
- A whole bank — hold BANK, then Export or Share.
- Options — a quick export sounds like what you're hearing, effects and speed included. Hold Export or Share to choose the format, the clip length and more.
On iPhone and iPad, clips go to the Files app, in the SnagTrax folder. On Android, they go to a folder you choose the first time. Lossless WAV comes with Plus.
Hardware Kits
With Pro, a bank can go out as an Akai MPC program or a Synthstrom Deluge kit, each bookmark on its own pad, ready to load on the hardware. Hold BANK, tap Export, and choose Akai MPC Program or Deluge Kit.
Make It Your Own
Choose a look, arrange your tools, and switch features on or off.
Make It Your Own
Choose a look, arrange your tools, and switch features on or off.
Themes
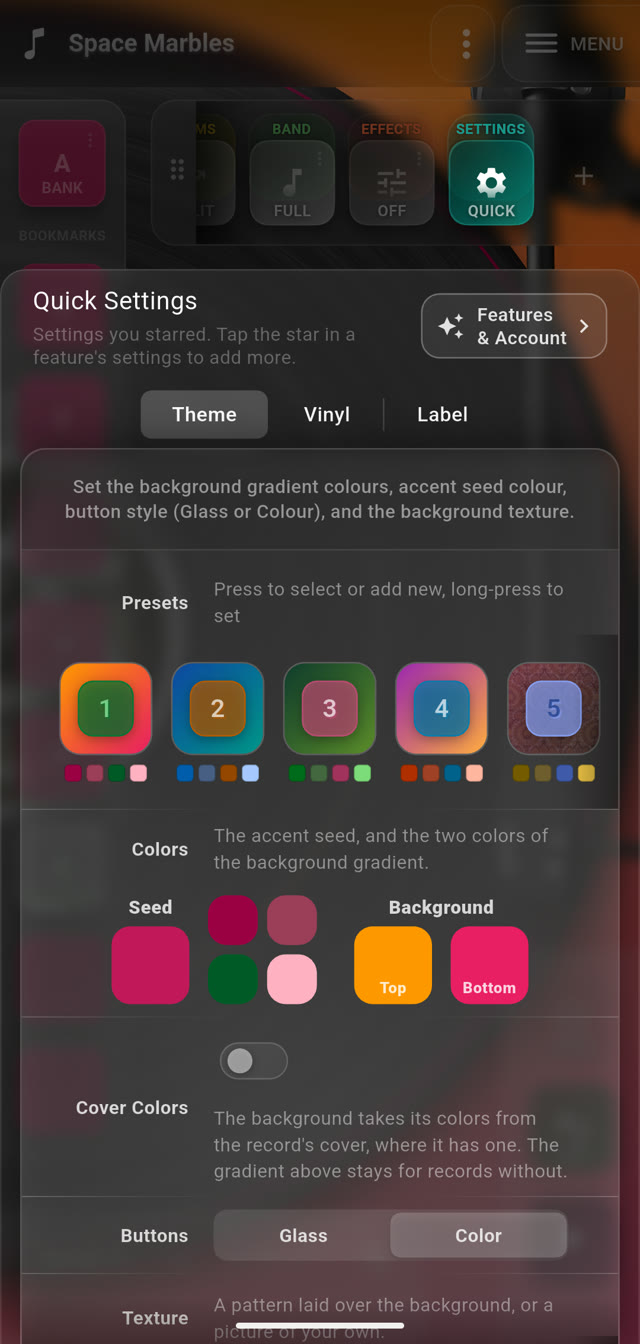
Open Settings and go to the Theme tab. The Presets strip holds eight complete looks, starting with Default, Ocean, Forest and Sunset: tap one to switch to it, or hold one to save your current look over it or delete it. Below it, change the colors and the background, pick a texture or your own image, let Cover Colors take the background from the album art, and choose Glass or Color buttons.
Arranging the Action Row
The tools above the record are yours to arrange. Tap + at the end of the row:
- In the row — hold a tool and drag it to reorder.
- Available — tap a tool to add it to the end of the row.
A greyed-out tool needs its feature switched on in Features & Account. Some tools only work with certain things playing, such as Mirror with videos. When you want the record to yourself, slide the row away by its handle.
Quick Settings
The Settings button in the action row opens Quick Settings: the settings pages you've starred, one tap away. Star a page with the star beside its name when you open it from Features & Account, and hold and drag the tabs to put them in your order.
Features & Account
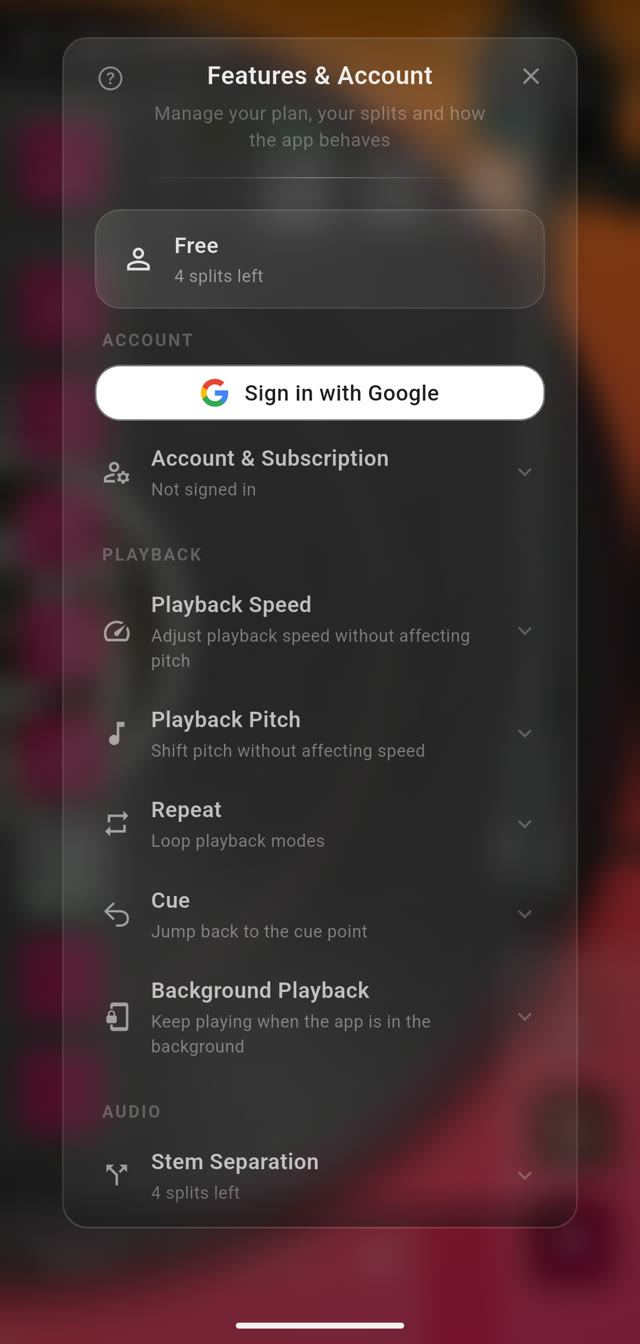
Features & Account, in the ⋮ menu at the top of the player, lists every feature with a switch and a short description. Turn off what you don't use and it leaves the screen. Under App, Interface holds how the app looks and feels:
- UI Scale — make everything larger or smaller.
- Frosted Glass — the blur behind panels. Switch it off first if the app feels slow on an older device.
- Double-Tap-Drag To Zoom — zoom the record with one finger.
- Tip Buttons — the ? on panels.
- Player Walkthrough — Show again plays the tour of the player.
- Resume Notice — the offer to carry on where you left off.
Background Playback keeps the music going when you switch apps or lock the screen; turn on Videos Too to keep a video's sound going as well. Language changes the app's language.
Sign In (Optional)
You don't need an account: play, split and export as a guest. Signing in — with Apple on iPhone and iPad, with Google on Android — gives you an account that a Plus or Pro subscription belongs to. Free weekly splits stay with the device. Sign in, sign out or delete your account in Features & Account; deleting the account doesn't cancel a subscription, so cancel that in the App Store or Google Play.
Tips & Troubleshooting
Quick answers when something isn't where you expect it.
Tips & Troubleshooting
Quick answers when something isn't where you expect it.
A button I want isn't there
Tap + at the end of the action row and add it. If it's greyed out, switch its feature on in Features & Account.
I can't split this track
Splitting works on songs and videos from your device, not on YouTube. With no splits left, wait for the weekly refill — Split Stems shows when it comes — or get Plus for unlimited splits. A track longer than your plan allows needs a bigger plan, and if other splits are still running, one has to finish before another can start.
Pitch or effects are missing
Pitch shifting and effects work on audio files. For videos and YouTube, speed, loops and bookmarks still work.
The music stops when I leave the app
Turn on Background Playback in Features & Account. For videos, turn on Videos Too as well.
The screen doesn't respond
It may be locked. Hold the label in the centre of the record for two seconds to unlock it.
The app feels slow
Switch off Frosted Glass in Features & Account → Interface. It makes the biggest difference on an older phone.
A file in History won't open
If the file has moved, or access to it has expired, SnagTrax asks you to locate it again. Tap Locate and pick the same file.
Still stuck?
Tell us what happened with Feedback in Features & Account, or get in touch here:
Words Used Here
What the app's words mean, in plain language.
Words Used Here
What the app's words mean, in plain language.
- Hold — Keep your finger on it for about half a second. Many buttons do one thing on a tap and another on a hold.
- Stems — The separate parts of a song — vocals, drums, bass and the rest — that splitting makes.
- Split — Separating a song into its stems. It happens on our servers and takes a few minutes.
- Bookmark — A saved moment in a track. It can have an end too, and then it's a section you can loop or export.
- Loop — A section that plays over and over, starting again the moment it ends.
- Bank — A set of eight bookmarks. Each track has four banks, A to D.
- Cue — The spot where the needle last came down on the record. CUE takes you back to it.
- BPM — Beats per minute: how fast the song's beat is.
- Key — The set of notes a song is built around, such as C major. Changing the key moves every note up or down together.
- Semitone — The smallest step between two notes. Twelve semitones make an octave.
- Transient — The start of a sound, like a drum hit — the spot a new bookmark can snap to.
- Pad — A square you tap to play a sound, as on a drum machine or sampler.
- Sampler — An instrument that plays recorded sounds from pads or keys, like an Akai MPC or a Synthstrom Deluge.
- Kit — A set of sounds laid out on a sampler's pads, one to a pad, ready to play.
Still stuck? Tell us what you were trying to do
↑